In order to customize the labels for the “quote request” payment method navigate to WooCommerce->settings->payment and click on quote request manage. Fillout the Title , Description and introduction. Save changes.

![]()

In order to customize the labels for the “quote request” payment method navigate to WooCommerce->settings->payment and click on quote request manage. Fillout the Title , Description and introduction. Save changes.
![]()
In order to customize your emails you can navigate to WooCommerce->settings->emails and click on manage and copy it to your theme folder. You can customize the email from there.
Free version emails:

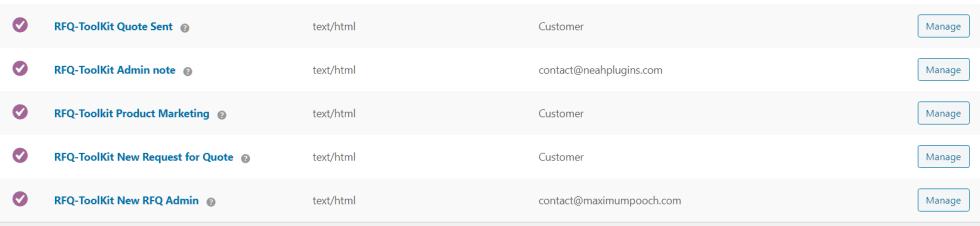

![]()
Click on manage.

At the bottom of the screen, click on copy template. The templates will get copied to your WooCommerce directory under your theme/child theme. You can edit the html and wordings in the template.

WooCommerce – QuickBooks Desktop Assistant

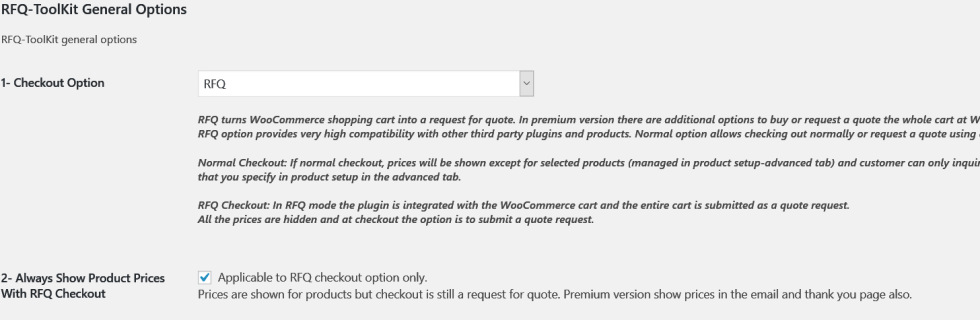
Set the setting to RFQ mode in setting 1 in general setting. Do not show prices. That will be the default.

Add the following to your functions.php
add_action('init', 'gpls_woo_rfq_check', 1000);
function gpls_woo_rfq_check(){
//check if the user should be able to see prices and purchase ( the normal WooCommerce setting)
//if so..
gpls_woo_rfq_purchase_only(); // user can see prices and purchase normally
gpls_woo_rfq_purchase_or_quote();// user can see prices, purchase or request a quote
}
There are multiple ways to customize the quote request page in the normal checkout mode.
First, in the free version, you can modify to the Quote Request page by using the template in “plugins/woo-rfq-for-woocommerce/woocommerce/woo-rfq/rfq-cart.php”. Copy the folder to the WooCommerce directory in your theme directory and modify it if you wish . You can control the layout and the page template for this page in your WordPress admin area. Typically the Quote Request page looks better with a full-width template without any side-bars.
Using the Plus version, you can customize the quote request page for visitors by navigating to WooCommerce->Settings->RFQ-Toolkit “Quote Request Page” tab. You can make hide or make the field required. Name and email can not be removed and will still be required fields. This feature is available in the Plus version.


Finally, using the Plus version, you can include a Ninja Form in the quote request page to include additional fields of your own choosing. You can create a Ninja form and then select that form in the settings. The form will show in the quote request page. Data captured by the form will show in the order and the email sent to admin.
You can make products to be quote items in bulk in a couple of ways. In the WooCommerce->settings->RFQ-Toolkit general setting. Under MISC options ( see screenshots below).
If your products categories are not setup to do this easily. Create a new category, “Quote” for example, apply that categories to all the products you want to activate. Then use option b and c above on that category. You can read here how to apply a category to products in bulk.

This post explains how to setup RFQ-ToolKit Plus to allow selected roles to be able to buy now or request a quote at WooCommerce checkout. All other customers can only request a quote at checkout.
Step1: Select RFQ and choose to show prices.

Step 2: Select to activate the rule and select roles. There are two options:
Option 1: Only selected roles can view prices. Also, only selected roles can purchase at checkout when using Option 5-buy now or request a quote. Other roles cannot view prices and can only request a quote at checkout.
Option 2: Only selected roles can request a quote when using Option 5-buy now or request a quote.
Other roles can view prices and can only purchase at checkout.

Step 3: Select option 5 to activate buy now or request a quote.

With this setup, your customers can checkout normally or request a quote at checkout.
This post explains how to setup RFQ-ToolKit Plus to buy now or request a quote at checkout-based on type of products in the cart. If the cart contains a quote item, then customer can only request a quote at checkout. Prices for these quote items can be optionally hidden or remain visible. Items are marked as quote items in the advanced section of product setup.

Select RFQ and choose to show prices.
Step 2: Select option 5 & 5c to activate the rule.


With this setup, if the cart contains a quote item, customer can only submit the cart as a quote request.
This post explains how to setup RFQ-ToolKit Plus to allow customers to buy now or request a quote at WooCommerce checkout. Customers can purchase normally at checkout or request a quote. You can optionally put a minimum purchase requirement as a condition to request a quote.
Step1: Select RFQ and choose to show prices.
Step 2: Select option 5 to activate the rule. You can optionally put a minimum amount to be eligible for asking for a quote. Below that amount is only option to purchase.

With this setup, your customers can checkout normally or request a quote at WooCommerce checkout.

A price quote sent to your customer is a great opportunity is an often neglected marketing opportunity. Customer has already shown interest in the product / service by inquiring. You can provide more product information, links to your social media sites, surveys for feedback and in general tell the customer about the benefits of doing business with you. Customer has already given you a clue by showing interest in a particular product. You can customize the marketing content to give relevant information for that product. RFQ-Toolkit can help you automate the process.
You can design your marketing content at the product category level or product level using the familiar WordPress HTML editor. You can access the editor by either editing a WooCommerce product category or the product’s advanced setup tab. Your email to the customer will include your content marketing material along with your proposal. Don’t miss on the opportunity to inform your customers when they inquire about your products.